|
Home
| |
Definition:
The Hood is a piece of clothing, which covers the head, and neck as well as
the shoulders of the wearer. Hoods were usually made from fabric but could also
be made from fleece or leather.
Origins and spread of the style:
Hoods started out life simply as the corner of a piece of cloth that was
being worn as a cloak. The corner was pulled up over the wearer's head.
"The hood had become separated from the cloak by the end of the twelfth
century, and was worn with a short neck-cape as an independent head-dress,
In the fourteenth century a long band (cornet or liripipe) was
added, hanging gown the back or one side. The part of the hood that closed
round the neck was the guleron or patte and the opening
framing the face was the visagiere. Worn up in the usual way, the
hood was said to be enforme; when it was pilled back to uncover the
head, it was described as en gorge, and when pulled forward to hide
the face, it was embronche. This later practice was forbidden in 1399
because of the opportunities it gave to armed attackers, and remained in use
only for funerals up until the funeral of Louis XIV." (1)
|

|
Hoods in various versions can be
seen in manuscripts from Ireland, France, England, Spain, Germany and the
Low Countries. Excavations have yielded hoods in England, Greenland, and
Denmark dating from the 14th C. (2). Many of the early hoods
which have been unearthed in Greenland and England, are 14th C
hoods which are snug fitting around the neck and held with buttons down the
front and under the chin. (3) |
Impact:
Hoods seem to have started out, as so many "fashion statements" do, as
something useful. Hoods started out as a functional garment for farmers,
shepherds, and other outdoor trades. It was a pull-on caped garment with a
slightly extended peak at the back of the head (4).
Hoods became popular and were worn by both men and women. Some of the very
stylish hoods had decorative dagging around the shoulder cape.
Around 1400, new ways of wearing the hood were found, and it began to be worn
as a hat (5). This style was popular until shaped hats became the vogue.
An SCA interpretation:
The following table compares some of the differences between how a hood was
typically constructed in period and how I construct the hoods I make for SCA.
| |
Period
materials/Techniques |
My Variations |
| Fabric |
Wool (fulled or
tabby woven), linen, leather, shearling. |
same |
| Thread |
White cotton or
wool thread or leather strips |
Cotton /poly or
cotton thread or leather strips |
Tools and Materials
1. Fabric: 1.5 yards of 60-inch fabric or 2 yards of 45-inch fabric
- Pre-wash and dry your fabric.
- If you are fulling your wool, see appendix 1
- If adding a lining, select a similar amount of fabric.
2. Thread: Use a good quality thread - a cotton/poly blend is just fine.
3. Sewing machine or hand needle
4. Face circumference measurement
5. Pattern
6. Chalk or tracing paper
Construction process
for a slip on style hood:
|
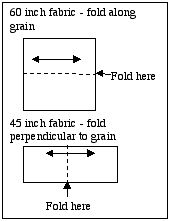
diagram 1
|
1. Wash and dry fabric
2. Measure face circumference - write this number down.
3. Make a square with each sides equal to 1/2 the face circumference. Set
this to the side
4. Fold your fabric in half. The folded side will become the top of your
hood
- If you are using a 60-inch fabric fold it along the grain
- If you are using a 45 inch, fold it perpendicular to the grain.
- Please see diagram 1.
|
 |
5. Place your square along the
top fold of your fabric.
6. Measure down to the bottom of your square, add 5/8" this will by where
you will cut the chin.
7. On the opposite side of the square, is the back of your skull, this is
where the liripipe belongs
- the longer the liripipe, the later the period the hood will
represent.
8. Cut the cape or gorget so that it is large enough to go around your
shoulders. (About 60 cm).
9. Sew the chin seam and the back seam, you can use a sewing machine for
this or you might choose to do it by hand.
10. Hem the face and bottom hem
You now have a basic slip on style hood!
|
Adding a lining
Follow the above steps, then...
11. Cut a second hood that will serve as lining - I like to use linen or
cotton for this.
12. When you sew the lining piece, leave a gap in the middle of the back seam
about 4 inches long - this will get sewn later.
13. Place the outer hood and lining hoods with right sides together, sew along
the bottom edge.
14. Turn the hood so that seam sides are together.
15. Sew the face - this can be a little tricky.
- In order to sew the face, you can do it by hand, but you can also do it
by machine without any nasty sewing machine stitching showing.
16. Match the chin seams together, turn in 5/8" and pin
17. Using the gap you left in the back seam, reach inside and pull the face
out though this gap - find the pin.
- Your fabric may seem a little twisted at this point - don't fret as long
as you pinned the chin seams, everything will come out the right direction!
- Sew the face pieces together
- Turn back thought the gap in the back lining
- Sew up the gap - press
But what about dags?…
Adding Dags
Follow steps 1-9 and steps 11-13
- Select a dagging patter such as crenellations, embattled, or pointed
- start with something simple
- Cut the shape out of cardboard, poster board, manila folder or something
like it.
- Using your pattern, trace the desired pattern along the bottom of your
hood using the seam you already made and the bottom of the dag.
- Pin carefully
- Sew along the chalk lines
- Cut out your shapes - Use Fraycheck at the seam points to avoid
your fabric tearing out.
- Let Fraycheck dry completely
- Turn your hood and its dags and follow steps 14-21
Construction Tips:
- If you are making dags, I like to make the shoulder cape a little longer
- If you are making crenellations, I like to leave a stitch or two at the
top of the curve, between each dag.
- Dags usually work best if you put them pretty close together.
- Don't try to "save time" by turning dag patterns up and down alternately,
it ends up looking pretty strange, and not very period.
Bibliography:
(1)Boucher, François; 20,000 Years of Fashion The History of Costume and
Personal Adornment. (Library of Congress # 66-12103).
(4)(5)Thursfield,Sarah; Medieval Tailor's Assistant: Making Common Garments
1200-1500 (ISBN: 0896762394)
(2)(3) Crowfoot, Elisabeth; Pritchard, Frances; Staniland, Kay: Textiles and
Clothing 1150-1450. Her Majesty's Stationery Office, Museum of London, 1992.
an excellent website for hood research:
http://www.personal.utulsa.edu/~marc-carlson/cloth/hoods.html
|


